The purpose of this post is to document how to optimise a PC to run Assetto Corsa Competizione (ACC) in VR. This is not an out-of-the-box experience, mainly because ACC is based on Unreal Engine, which in itself is not geared towards VR nor fast action/movement the likes of which a sim requires: ACC proves this point, as did the latest WRC. It’s workable, but it could be better and this post hopes to show how it can be made better.
Note also that it took a long time to gather together all these disparate crumbs of info from all the noise on so many discussion forums, Reddits, Discords, YouTube videos etc, and believe me on the interwebs there is a lot of duff info, extreme views, wrong views, and out-of-date info that is never redacted. And to think AIs base their ramblings on such ramblings… Regardless, where applicable I’ve included links to posts which go into more depth about a particular topic, and from which you can glean the necessary background information.
Anyway, I’m starting to use Le Mans Ultimate now, so before I start tweaking that in VR (it’s is not based on Unreal Engine), I thought it best to document how I tweaked my installation to experience ACC in VR at its best.
PC Components
Every PC is different and what options, settings, and tweaks works with one PC will undoubtedly have to be different to take into account the constraints of another PC. Thus, what follows is based on my specs and preferences and, when optimising ACC with VR, your mileage may well differ.
My PC Components
Motherboard: ASRock Z790 PG-ITX/TB4 Mini ITX LGA1700
Processor: Intel Core i7-14700K 3.4 GHz 20-Core Processor
CPU Water Cooler : Thermaltake 280mm TH280 ULTRA V2 ARGB Black Sync All In One
Memory : Corsair Vengeance 32 GB (2 x 16 GB) DDR5-7200 CL34
Graphics Card : MSI NVIDIA GeForce RTX 4090 24GB VENTUS 3X E OC
Storage : Samsung 990 Pro 1 TB M.2-2280 PCIe 4.0 X4 NVME Solid State Drive
Headset : Meta Quest 3 256Gb
As you can probably appreciate, even with the introduction of the RTX5090 cards, this is a pretty high spec configuration which allows me to play non-VR games in 4K, and affords a good VR exeperience.
Related link: My PartsPicker Config
Meta Quest 3
Meta Quest Link App
To experience any racing sim at high-ish fidelity through a Meta Quest 3 (MQ3) headset, you should do so over a USB 3 link cable. Playing something slower paced, such as Half Life Alyx, is fine over WIFI, but even with a 6E router I found the bandwidth constraints too much.
The MetaQuest Link app is required to enable the link from within the MQ3 to your PC. This app allows for a few parameters to be tweaked.
- Open the Meta Quest Link app
- From the left hand column, select Devices
- Assuming your headset is active, click on the graphic of the device
- Under Advanced, select Graphic Preferences
- Set the Refresh Rate to 90Hz
- Select the Rendering Resolution to 4704 x 2528 (1.3x)
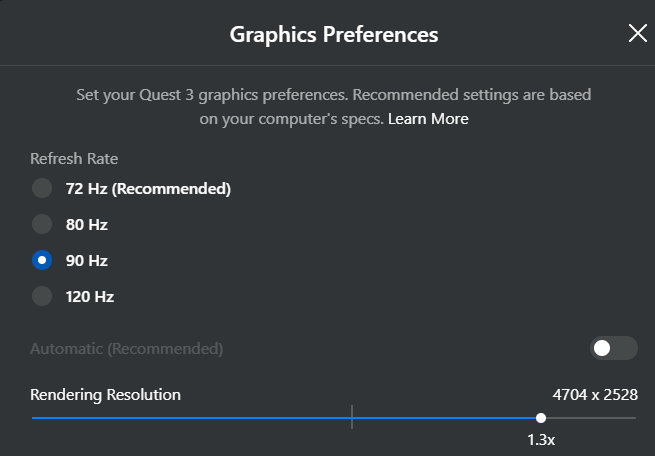
Note these options these represent the best compromise settings when balancing performance of the graphics card, race sim playability and experience/realism, as well as smoothness of in-headset experience.
Oculus Debug Tool
The Oculus Debug Tool allows you to manipulate the settings of a MQ3 headset at a lower level than permitted by the MetaQuest Link app, above. The tool is part of the Oculus PC software and can be found in the installation directory. To locate it, navigate to the Oculus installation folder (usually C:\Program Files\Oculus), then go to Support\oculus-diagnostics. Double-click OculusDebugTool.exe to launch it.
As supplied, the default values are
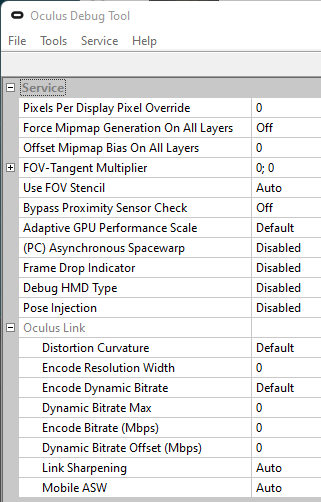
Note: reviewing the above values, Asynchronous Spacewarp is often enabled … at some point!
Essentially what values need to be updated in tool to optimise the MQ3 for ACC are:
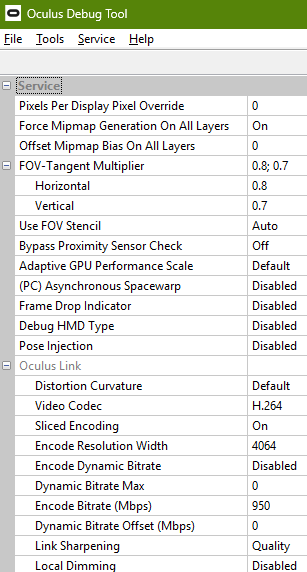
In summary, compared to default values, what has changed and their values are:
- Pixels per display pixel override = 0
- Force mipmap generation on all layers = On
- Offset mipmap bias on all layers = 0
- FOV tangent multiplier =0.8 for Horizontal & 0.7 for vertical
- Use FOV stencil = Auto
- Adaptive GPU performance scale = Default
- Asynchronous Spacewarp = Disabled
- Video Codec H.264
- Encode Resolution Width = 4096 (should be this, not 4064)
- Encode bitrate (Mbps) = 950
The biggest gains here are the setting of FOV tangent multiplier. Essentially this is the size of your viewing window and, by reducing the window size, you are reducing how big an area of the simulated world your GPU has to render. However, if you reduce the values too much, you will break the illusion of the simulated world because you will then become aware of that window.
For the values above, if I’m very careful, and press the headset as much to my face as possible (uncomfortably so) and look up/down, I can see the “hard black wall” above/below the viewing window. Remember also that if you were racing one of these cars you would be wearing a helmet so your field of view is naturally restricted, so a black bar simulates that … ? Hmmm
One problem is that some of these settings are lost each time your PC is rebooted. It can be tiresome having to enter these each time ACC is to be played. This is where a batch file helps! The input to the batch file we will call MetaQuest3_ACC_Config.txt and its contents consist of:
service set-pixels-per-display-pixel-override 0
service set-force-mip-gen-on-all-layers true
service set-offset-mip-bias-on-all-layers false
service set-client-fov-tan-angle-multiplier 0.8 0.7
service set-use-fov-stencil true
service enable-adaptive-gpu-perf-scale true
server:asw.Off
The above is the input to the command which will be called from the batch file itself, called MetaQuest3_ACC_Config.bat and its contents are:
START "Oculus Debug Tool CLI" /d "C:\Program Files\Oculus\Support\oculus-diagnostics\" /wait OculusDebugToolCLI.exe -f "<directory of input to batch file>\MetaQuest3_ACC_Config.txt"
EXIT
Nvidia Changes
7th Jan 2026: It’s CES time in Las Vegas and NVidia has announced DLSSv4.5! The upshot of this is that
- DLSS Swapper will display the new v310.5 of the DLL (previously v310.3)
- NVidia Profile Inspector, can be used to leverage the new Preset M
DLSS 4
Suffice to say that keeping drivers up-to-date on any system is essential maintenance and particularly so for graphics cards. Up until the end of 2024, using DLSS with ACC VR was a bit of a non-starter because it caused a lot of smearing, ghosting and shimmering. The release of DLSS 4 on 30th January 2025 addressed these issues, as well as lowering memory usage by 20% So, if you’re lagging behind with the version of your drivers, rectify that issue now!
DLSS 4 and the following two steps combined were easily the biggest game changers when it came to playing ACC in VR and, for non-VR, provided the biggest FPS gains.
DLSS Swapper
It seems that ACC (and tons of other games) don’t implement the latest DLL as they get released from Nvidia. As a result, ACC implements DLSS DLL version 2.2.15, whereas the latest version is well beyond that – at the time of writing, forty-seven revisions later at v310.3!! Suffice to say, upgrades usually always bring performance and visual upgrades.
Thankfully Nvidia has made these files swappable so if you have the latest DLL you can manually go into your game’s files and swap the old DLL for the new one. However, to make this process less fraught and error prone there are utilities available to ease this process and I’d recommend DLSS Swapper.
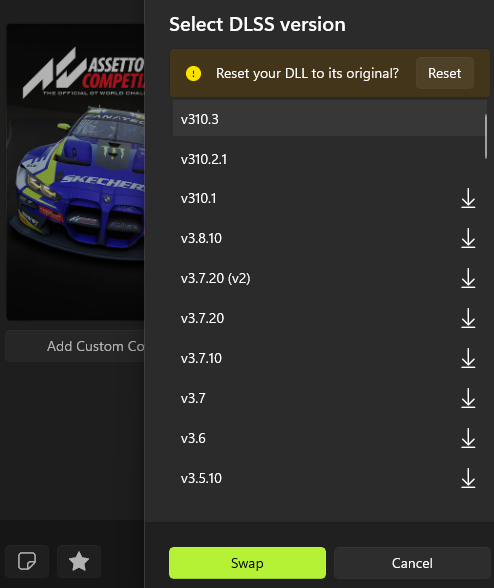
The simplicity of this DLSS DLL swapper utility is that it allows you to easily compare before and after scenarios or, if the latest and greatest proves not to be so great, easily back-date to an earlier DLL, or reset it entirely to the original version used by ACC.
Related post: https://www.reddit.com/r/ACCompetizione/comments/170girw/improved_performance_and_image_quality/
NVidia Profile Inspector
Another app which fiddles with NVidia settings at an even lower level is NVidia Profile Inspector. On the GitHub page shown, click Assets and download the zip, extract it and copy the resulting folder to Program Files.
It’s best to read the Related Post linked below, but essentially what’s required is to use the Profiles field to locate ACC. Thereafter, scroll down to the Common section and locate the DLSS – Forced Preset Letter and click the dropdown box next to it. Select Always use latest.
To make this change stick, hit the Apply changes button in the top right corner.
Note that DLSS – Enable DLL Override can be ignored because you’ve already replaced the DLL with the aforementioned DLSS Swapper above.
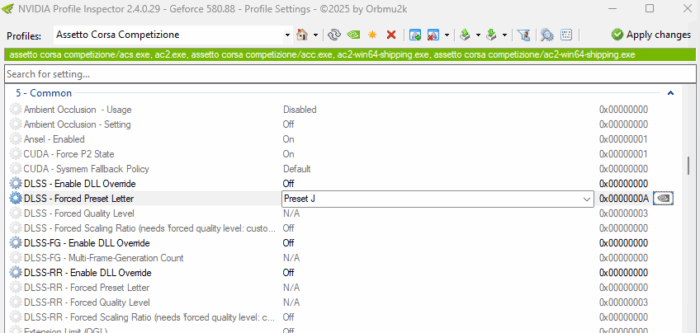
Lastly, both DLSS-RR (Ray Reconstruction) and DLSS FG (Frame Generation) are not used in ACC, thus there is no point in applying overrides here.
DLSS Preset Letter
Going back to the point about the DLSS – Forced Preset Letter parameter, if things are not to your liking when Always use latest is employed, I’d say from experience that it’s also worth experimenting with the Preset J.
Remember also that DLSS defaults and presets are subject to change with new versions of DLSS.
Presets are subject to change with each revision, but the following serves as a general guide for experimentations with the current presets:
- Presets A – E: Deprecated and will be remove in subsequent releases. Please do not use.
- Preset F (intended for Ultra Perf/DLAA modes): The default preset for Ultra Performance mode.
- Preset G (Unused): Do not use – reverts to default behavior
- Preset H (reserved): Do not use – reverts to default behavior
- Preset I (reserved): Do not use – reverts to default behavior
- Preset J: Similar to preset K. Preset J might exhibit slightly less ghosting at the cost of extra flickering.
Preset K is generally recommended over preset J - Preset K: Default preset for DLAA/Performance/Balanced/Quality modes that is transformer based.
Related post: https://www.reddit.com/r/nvidia/comments/1i82rp6/dlss_4_dlls_from_cyberpunk_patch_221/
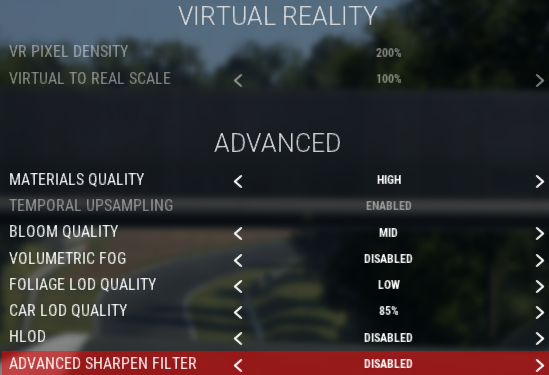
The Game Itself
This area is the most subjective and where the most experimentation will have to take place. Whether an option is set to Epic > High > Mid > Low will be very dependant upon your PC’s specification, as well as your own preferences.
With the latter in mind, for example, I prefer to have Contact Shadows enabled otherwise the cars appear to float above the surface of the track and, for me, that detracts from the immersion. However, it is costly in terms of GPU grunt used.
Note that to allow the screen grabs below to be taken, ACC was run in windows mode (as opposed to in VR). Thus options, such as those under Virtual Reality, are displayed below as greyed out, as if not updateable. They will be when the headset is used!
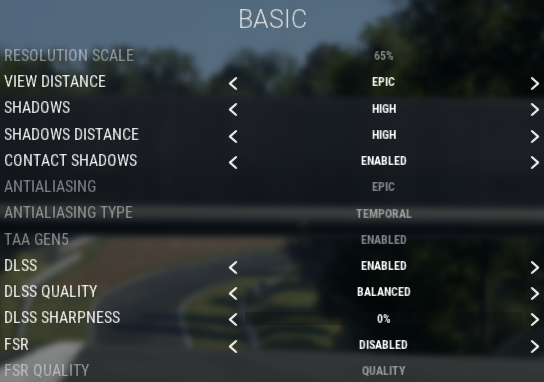
In the above, not that DLSS Sharpness is disabled. The same applies to other subsequent Sharpness options. This is because a MQ3 performs it’s own sharpening and this was set earlier in the Oculus Debug Tool (Link Sharpening to Quality).
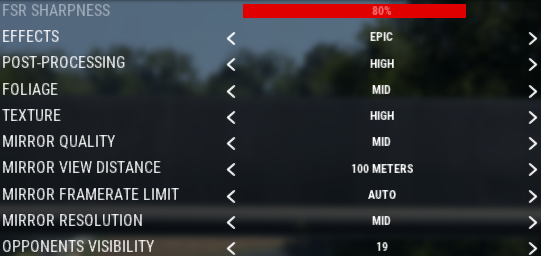
GPU-wise, I believe that the quality and distance shown in mirrors are the big hitters.
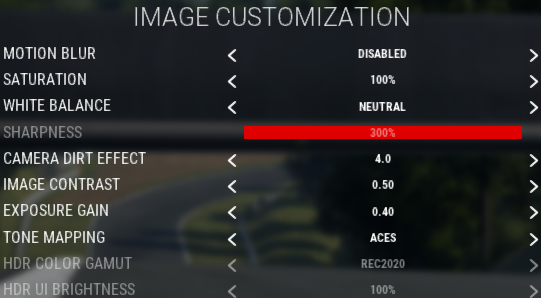
Personally, I don’t like Motion blur and, just to add to my dislike of it, it does incur a large-ish GPU performance overhead.