When you purchase a new aquarium you can not immediately put fish into it. To do so will induce a protracted and cruel death for any livestock.
Instead, you have to cycle your tank, which involves ensuring your aquarium is full of beneficial bacteria (Nitrosomonas) which can break down ammonia/NH3 (generated by fish poo, uneaten food and other detritus) into nitrite/NO2.
Subsequently, other beneficial bacteria (Nitrobacter) can break nitrite down to nitrate/NO3, which isn’t as toxic to fish as the previous two chemicals and can be taken up by plants.
This near-virtuous circle (you’ll probably still have to do water changes to dilute the nitrate build-up) is known as the nitrogen cycle. But to get it up and running takes some patience – up to a month.
I use an aquarium test kit to track the water parameters of my aquarium. The test kit is from NT Labs and it tests for the aforementioned chemicals that make up the nitrogen cycle (ammonia/NH3 > nitrite/NO2 > nitrate/NO3) as well as pH (acidic to alkaline), Carbonate Hardness/KH, and General Hardness/GH.
Living in Glasgow, Scotland means my tap water is very, very soft, with near zero KH and GH. Thus, to provide some buffering in pH swings, I have to add a KH booster (from Arka), and do so up to a value of 3 or 4. For GH I use Seachem Equilibrium
Below you can see a graph of these water parameters, and from mid-October 2025 through to November you can see the nitrogen cycle running its course.
Imbed with custom width & height + Scrolling enabled
The purpose of this post is to document how to optimise a PC to run Assetto Corsa Competizione (ACC) in VR. This is not an out-of-the-box experience, mainly because ACC is based on Unreal Engine, which in itself is not geared towards VR, nor fast action/movement the likes of which a sim requires: ACC proves this point, as did the latest WRC. It’s workable, but it could be better and this post hopes to show how it can be made better.
Note also that it took a long time to gather together all these disparate crumbs of info from all the noise on so many discussion forums, Reddits, Discords, YouTube videos etc, and believe me on the interwebs there is a lot of duff info, extreme views, wrong views, and out-of-date info that is never redacted. And to think AIs base their ramblings on such ramblings… Regardless, where applicable I’ve included links to posts which go into more depth about a particular topic and from which you can glean the necessary background information.
Anyway, I’m starting to use Le Mans Ultimate now, so before I start tweaking that in VR (it’s is not based on Unreal Engine), I thought it best to document how I tweaked my installation to experience ACC in VR at its best.
Every PC is different and what options, settings, and tweaks works with one PC will undoubtedly have to be different to take into account the constraints of another PC. Thus, what follows is based on my specs and preferences and, when optimising ACC with VR, your mileage may well differ.
My PC Components
Motherboard: ASRock Z790 PG-ITX/TB4 Mini ITX LGA1700
Storage : Samsung 990 Pro 1 TB M.2-2280 PCIe 4.0 X4 NVME Solid State Drive
Headset : Meta Quest 3 256Gb
As you can probably appreciate, even with the introduction of the RTX5090 cards, this is a pretty high spec configuration which allows me to play non-VR games in 4K, and affords a good VR experience.
To experience any racing sim at high-ish fidelity through a Meta Quest 3 (MQ3) headset, you should do so over a USB 3 link cable. Playing something slower paced, such as Half Life Alyx, is fine over WIFI, but even with a 6E router I found the bandwidth constraints too much.
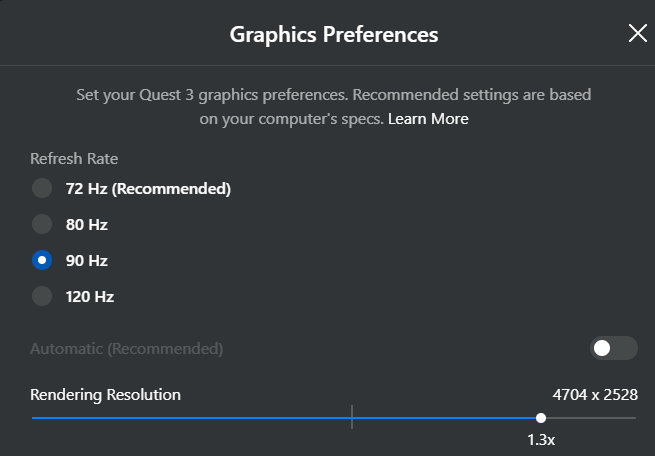
The MetaQuest Link app is required to enable the link from within the MQ3 to your PC. This app allows for a few parameters to be tweaked.
Assuming your headset is active, click on the graphic of the device
Under Advanced, select Graphic Preferences
Set the Refresh Rate to 90Hz
Select the Rendering Resolution to 4704 x 2528 (1.3x)
MetaQuest 3 Graphic Preferences
Note these options these represent the best compromise settings when balancing performance of the graphics card, race sim playability and experience/realism, as well as smoothness of in-headset experience.
Oculus Debug Tool
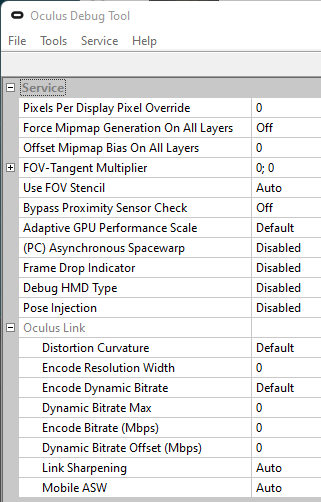
The Oculus Debug Tool allows you to manipulate the settings of a MQ3 headset at a lower level than permitted by the MetaQuest Link app, above. The tool is part of the Oculus PC software and can be found in the installation directory. To locate it, navigate to the Oculus installation folder (usually C:\Program Files\Oculus), then go to Support\oculus-diagnostics. Double-click OculusDebugTool.exe to launch it.
As supplied, the default values are
Oculus Debug Tool Default values
Note: reviewing the above values, Asynchronous Spacewarp is often enabled … at some point!
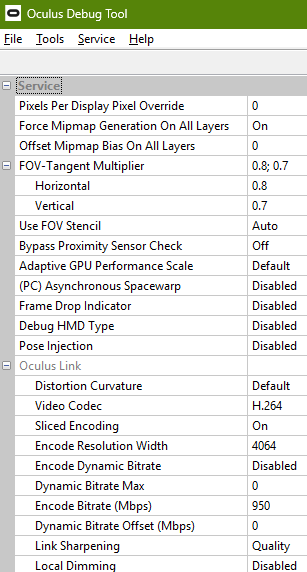
Essentially what values need to be updated in tool to optimise the MQ3 for ACC are:
Oculus Debug tool settings for ACC
In summary, compared to default values, what has changed and their values are:
Pixels per display pixel override = 0
Force mipmap generation on all layers = On
Offset mipmap bias on all layers = 0
FOV tangent multiplier =0.8 for Horizontal & 0.7 for vertical
Use FOV stencil = Auto
Adaptive GPU performance scale = Default
Asynchronous Spacewarp = Disabled
Video Codec H.264
Encode Resolution Width = 4096 (should be this, not 4064)
Encode bitrate (Mbps) = 950
The biggest gains here are the setting of FOV tangent multiplier. Essentially this is the size of your viewing window and, by reducing the window size, you are reducing how big an area of the simulated world your GPU has to render. However, if you reduce the values too much, you will break the illusion of the simulated world because you will then become aware of that window.
For the values above, if I’m very careful, and press the headset as much to my face as possible (uncomfortably so) and look up/down, I can see the “hard black wall” above/below the viewing window. Remember also that if you were racing one of these cars you would be wearing a helmet so your field of view is naturally restricted, so a black bar simulates that … ? Hmmm
One problem is that some of these settings are lost each time your PC is rebooted. It can be tiresome having to enter these each time ACC is to be played. This is where a batch file helps! The input to the batch file we will call MetaQuest3_ACC_Config.txt and its contents consist of:
service set-pixels-per-display-pixel-override 0
service set-force-mip-gen-on-all-layers true
service set-offset-mip-bias-on-all-layers false
service set-client-fov-tan-angle-multiplier 0.8 0.7
service set-use-fov-stencil true
service enable-adaptive-gpu-perf-scale true
server:asw.Off
The above is the input to the command which will be called from the batch file itself, called MetaQuest3_ACC_Config.bat and its contents are:
START "Oculus Debug Tool CLI" /d "C:\Program Files\Oculus\Support\oculus-diagnostics\" /wait OculusDebugToolCLI.exe -f "<directory of input to batch file>\MetaQuest3_ACC_Config.txt"
EXIT
Nvidia Changes
7th Jan 2026: It’s CES time in Las Vegas and NVidia has announced DLSSv4.5! The upshot of this is that
DLSS Swapper will display the new v310.5 of the DLL (previously v310.3)
NVidia Profile Inspector, can be used to leverage the new Preset M
DLSS 4
Suffice to say that keeping drivers up-to-date on any system is essential maintenance and particularly so for graphics cards. Up until the end of 2024, using DLSS with ACC VR was a bit of a non-starter because it caused a lot of smearing, ghosting and shimmering. The release of DLSS 4 on 30th January 2025 addressed these issues, as well as lowering memory usage by 20% So, if you’re lagging behind with the version of your drivers, rectify that issue now!
DLSS 4 and the following two steps combined were easily the biggest game changers when it came to playing ACC in VR and, for non-VR, provided the biggest FPS gains.
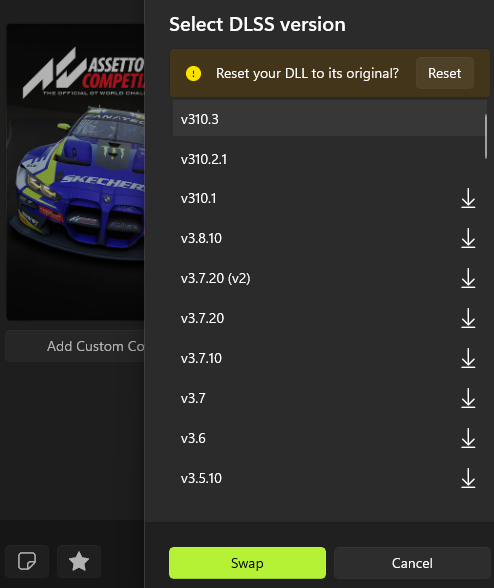
DLSS Swapper
It seems that ACC (and tons of other games) don’t implement the latest DLL as they get released from Nvidia. As a result, ACC implements DLSS DLL version 2.2.15, whereas the latest version is well beyond that – at the time of writing, forty-seven revisions later at v310.3!! Suffice to say, upgrades usually always bring performance and visual upgrades.
Thankfully Nvidia has made these files swappable so if you have the latest DLL you can manually go into your game’s files and swap the old DLL for the new one. However, to make this process less fraught and error prone there are utilities available to ease this process and I’d recommend DLSS Swapper.
Update ACC’s DLSS DLL using DLSS Swapper
The simplicity of this DLSS DLL swapper utility is that it allows you to easily compare before and after scenarios or, if the latest and greatest proves not to be so great, easily back-date to an earlier DLL, or reset it entirely to the original version used by ACC.
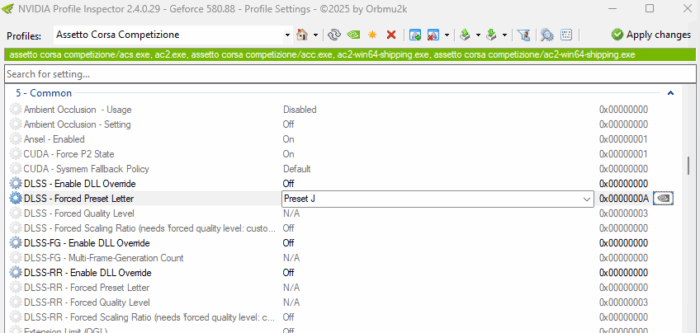
Another app which fiddles with NVidia settings at an even lower level is NVidia Profile Inspector. On the GitHub page shown, click Assets and download the zip, extract it and copy the resulting folder to Program Files.
It’s best to read the Related Post linked below, but essentially what’s required is to use the Profiles field to locate ACC. Thereafter, scroll down to the Common section and locate the DLSS – Forced Preset Letter and click the dropdown box next to it. Select Always use latest.
To make this change stick, hit the Apply changes button in the top right corner.
Note that DLSS – Enable DLL Override can be ignored because you’ve already replaced the DLL with the aforementioned DLSS Swapper above.
NVidia Profile Inspector Updates for ACC
Lastly, both DLSS-RR (Ray Reconstruction) and DLSS FG (Frame Generation) are not used in ACC, thus there is no point in applying overrides here.
DLSS Preset Letter
Going back to the point about the DLSS – Forced Preset Letter parameter, if things are not to your liking when Always use latest is employed, I’d say from experience that it’s also worth experimenting with the Preset J.
Remember also that DLSS defaults and presets are subject to change with new versions of DLSS.
Presets are subject to change with each revision, but the following serves as a general guide for experimentations with the current presets:
Presets A – E: Deprecated and will be remove in subsequent releases. Please do not use.
Preset F (intended for Ultra Perf/DLAA modes): The default preset for Ultra Performance mode.
Preset G (Unused): Do not use – reverts to default behavior
Preset H (reserved): Do not use – reverts to default behavior
Preset I (reserved): Do not use – reverts to default behavior
Preset J: Similar to preset K. Preset J might exhibit slightly less ghosting at the cost of extra flickering. Preset K is generally recommended over preset J
Preset K: Default preset for DLAA/Performance/Balanced/Quality modes that is transformer based.
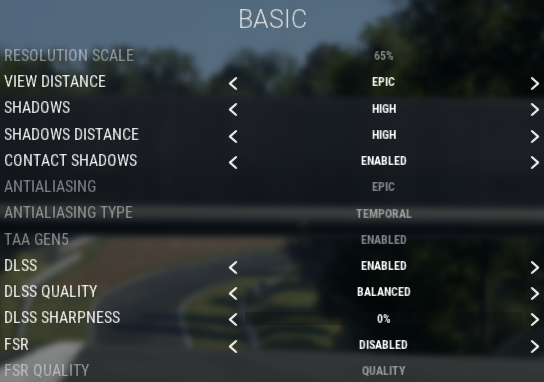
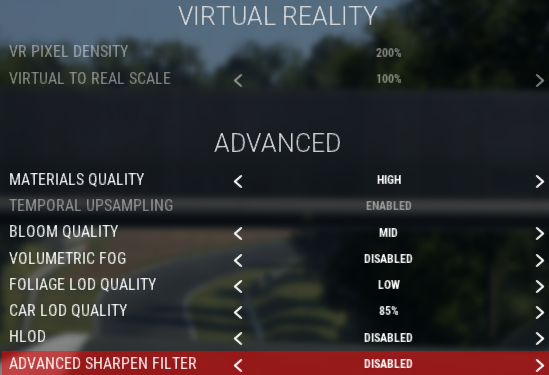
This area is the most subjective and where the most experimentation will have to take place. Whether an option is set to Epic > High > Mid > Low will be very dependant upon your PC’s specification, as well as your own preferences.
With the latter in mind, for example, I prefer to have Contact Shadows enabled otherwise the cars appear to float above the surface of the track and, for me, that detracts from the immersion. However, it is costly in terms of GPU grunt used.
Note that to allow the screen grabs below to be taken, ACC was run in windows mode (as opposed to in VR). Thus options, such as those under Virtual Reality, are displayed below as greyed out, as if not updateable. They will be when the headset is used!
ACC Video Options: Basic Options 1
In the above, not that DLSS Sharpness is disabled. The same applies to other subsequent Sharpness options. This is because a MQ3 performs it’s own sharpening and this was set earlier in the Oculus Debug Tool (Link Sharpening to Quality).
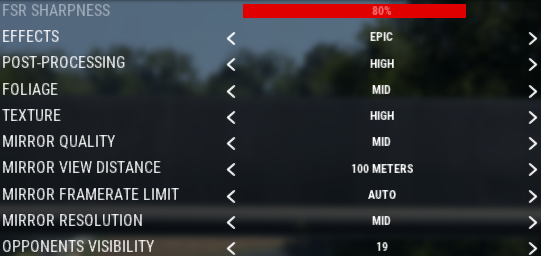
ACC Video Options: Basic Options 2
GPU-wise, I believe that the quality and distance shown in mirrors are the big hitters.
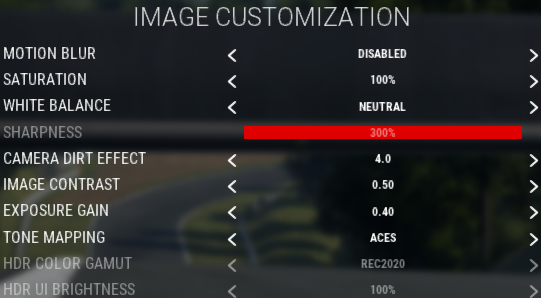
ACC Video Options: Image Customisation
Personally, I don’t like Motion blur and, just to add to my dislike of it, it does incur a large-ish GPU performance overhead.
A decades long ménage à trois of computers, sim racing and F1
My introduction to sim racing started back in the mid 80’s when I had a Sinclair ZX Spectrum and anything related to it and programming was my teenage obsession. I have a vague memory of reading a programming article about coding 3D-esque type games by using parallax scrolling and, due to also being an F1 fan, I subsequently attempted to marry the two interests by writing a racing game using the technique. It kinda worked, but the limitations of the machine’s processing and graphics meant it was relegated to a shelved programming project.
Time moved on, the 80s slipped by, as had my original 16K ZX Spectrum and its wobbly RAMpac, a ZX Spectrum+ replacement, an Amstrad CPC 6128, and an Atari 1040ST. The 90s saw my IT addiction transfigured into a beige PC, initially in the form of an Amstrad PC and then a far better milky white tower system from Gateway 2000, an even better Dell and then Dell laptops proved to be both price attainable and space efficient … though, alongside the hardware, my memory darkens so my timeline might be slipping into the noughties at this latter point.
Anyway, while the IT addition ran amok, the love of F1 hadn’t died and sim racing during the 90’s era of beige meant I played Grand Prix 2. Since my PCs were geared towards the hobbyist spec, and not gaming, a few years later I purchased a Playstation PS1 and Colin McRae Rally – including the purchase of a steering wheel and pedals (serious stuff!) But, despite being seemingly mind-blowing at the time these sims were tame stuff compared to what a sim racer has available to them in the present day.
When I say present day, well more like 2020, at which point I had retired and not played a racing sim in the intervening “serious” years of my IT career. The purchase of a Xbox Series X games console towards the end of 2020, alongside a Xbox Games Pass subscription meant that I discovered Forza Horizon 4. Wow! Okay, it’s more of an arcade-sim but jeez-oh was it addictive. Forza Horizon 5 came along in the spring of 2021 (more wow, more exclamation marks), I also came across Forza Motorsport 7 , and shortly thereafter Forza Motorsport neither of which I was particularly taken by (not so wow, and not serious enough).
Then both Assetto Corsa and Assetto Corsa Competizione caught my eye. I was hooked, I bought a Fanatec wheelbase, steering wheel, and pedals … and then realised that to become more serious I had to buy a PC. Alas, being an IT addict I had to build my gaming PC and spec it with the best in-class components. The story continues…
For those of you who don’t know, Synology’s Video Station package provides a graphical front end to any video content you store on a Synology NAS. This post primarily came about because Synology, with its latest update to DSM (DiskStation Manager v7.2.2 onwards), dropped support of their own Video Station package.
NAS Upgrade
The second driver for this post was that my previous Synology NAS, a DS213+, was limited to upgrading only as far as DSM v6.2.4. This is due to Synology announcing EoL for this version of DSM being October 1, 2024. This forced me to upgrade my NAS Q2 2024 to a DS423+. Thus, with an increase from 2 to 4 bays, and the purchase of larger capacity drives (the MTTF of the existing decades old drives in the DS213+ was foreseeable!), I now had a great deal more storage available. Certainly enough to store several hundred movies and TV shows.
‘Plexed
So what to do if, like me, you used Video Station but wanted to ensure you can continue to be up-to-date with DSM – you might as well because it is inevitable that Synology will drop support for v7.2.1 at some point in the future.
There are a number of packages out there that can be installed on DSM which will give you equivalent functionality to Video Station. I decided to opt for Plex. In part, because it is readily available as an app on all the LG televisions we have at home, and also on our Android devices.
Best practice configuration of your video library under Plex is discussed later, but for the time being lets continue with rounding up all the other constituent parts…
Up to the Job
The other major piece of the “lets rip my whole video collection” challenge was the building of a high spec gaming PC in H1 2024. Once the DVD/Blu-ray disc has been decrypted to a file, the new PC reduced the whole ripping process from some 8+ hours per DVD disc, on an aging Sony laptop, to no more than 10 minutes! Which is just insane and a testament to the march of technology.
Let’s Get Ripping
With the aforementioned jigsaw pieces in place, I now had the major building blocks to create the “big picture”, namely ripping my entire video collection and have it available to play, on any device, anywhere.
To do so, three more pieces were required:
A Blu-ray player
MakeMKV
Handbrake
Blu-ray Player
A list of Blu-ray players that are ideally suited to the task of ripping, and which can also be leveraged to rip 4K UHD discs, is listed in the MakeMKV forums.
Pioneer seem to be the most highly regarded brand. Alas, I have a decades old Samsung Blu-ray with a micro USB v1 connector. I’m sure a newer drive would be quicker, but I’m not sure I can justify the cost of a new one given that I don’t believe it would be night & day quicker. In addition, since I only have a collection of HD Blu-rays, there is no 4K requirement to force me to upgrade.
Obviously, things will change if I decide to go down the 4K UHD route which, given my ownership of OLED UHD televisions is likely but, for the time being, I’ll stick with what I’ve got. Regardless of whether it is a DVD, standard Blu-Ray or 4K disc being ripped, the principles outlined below remain pretty much the same.
MakeMKV
MakeMKV reads the contents of DVD/Blu-ray discs, decrypts them, and then writes the various titles (film + special features) out to your PC’s hard drive.
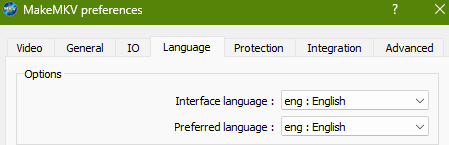
MakeMKV is a fairly easy tool to use, but a great deal of tedious grunt work can be removed from the ripping process by editing your preferences to ensure that only English tracks (audio and subtitles) are selected.
MakeMKV Preferences window
If you don’t do so, you will have to laboriously deselect the French, German, Japanese, Dutch, Portuguese etc tracks either in MakeMKV or later in Handbrake. Human error in this manual process will inevitably creep in and the processing of this extra data just gobbles up more CPU cycles, storage and, when streamed, your available bandwidth. You know it makes sense…
Video Title Selection
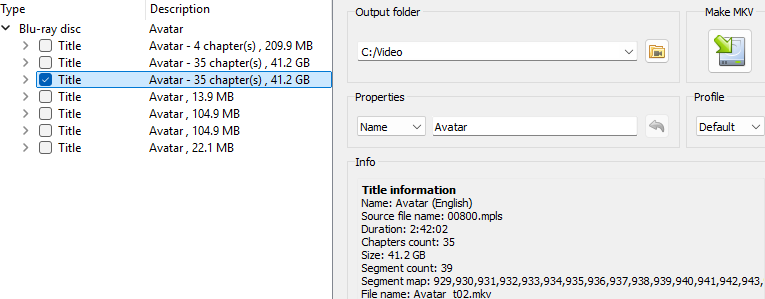
Ordinarily, it should be fairly self evident which title represents the main feature – in terms of gigabytes it will be the largest, with the greatest number of chapters etc. However, on some discs there can be one or more duplicates.
MakeMKV Example of duplicate main feature Titles
When you look more closely though, you will observe that each “duplicate” title references a different playlist (00800.mpls, 00801.mpls etc listed by MakeMKV as a Source file name), and each of these different playlists, although mostly identical, in terms of the segments they reference (listed by MakeMKV as a Segment map), will contain subtle differences.
As a general rule of thumb, opt to rip the lowest/even numbered track i.e. 0000.mpls or 0100.mpls, 0800.mpls etc. By way of example, Avatar has two “duplicated” tracks, but one of them uses playlist 00800.mpls which has the subtitles for the Na’Vi language burned in; that way when the Na’Vi are speaking to each other in their native tongue, you can automatically see/read the subtitled translation. If, on the other hand, you opted to rip the track with the 00801.mpls playlist, in the same Na’Vi scenes, you would have to pause the film and select the English subtitle track to understand what was being said. Unless of course you’re a native speaker of Na’Vi …
Audio Track Selection
It is worth playing back the ripped movie and looking at what audio tracks are available. Typically you may find a selection of:
audio description tracks (for people who are deaf or hard of hearing)
isolated movie soundtrack
These can add to the resulting file size, so depending on your needs/wants you may wish to deselect these in MakeMKV prior to ripping the disc. If you forget at this stage, you can always remove them using Handbrake…
Handbrake
Handbrake is a tool that digests the decrypted & ripped DVD/Blu-ray MKV file created as output by MakeMKV (above), and converts it into whatever type of file your heart desires. Since the output from MakeMKV is raw and uncompressed data, Handbrake will use some form of compression algorithm to greatly reduce the size of the resulting file.
In my case, I wish to retain the visual and audio integrity of the media as best I can; otherwise I might as well use an online streaming service to watch them. The following Handbrake related sections outline how I achieve this.
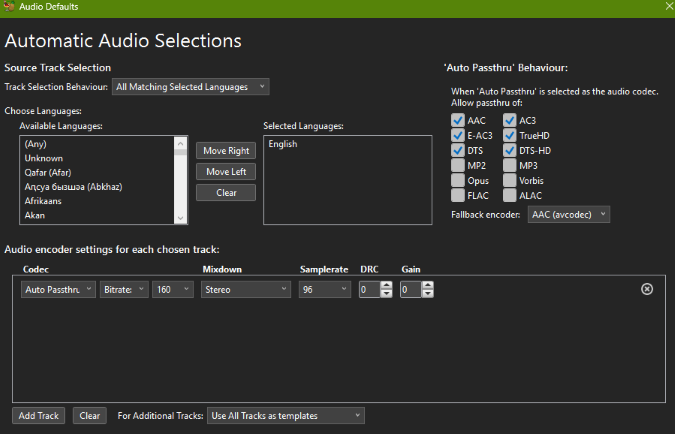
Audio Selection Behaviour
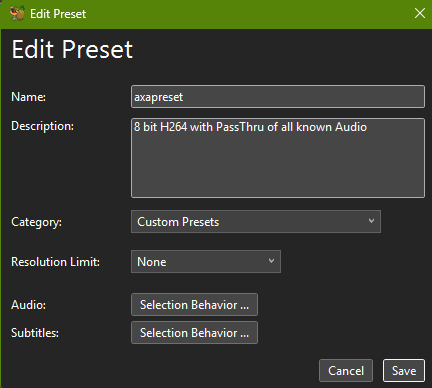
When creating my own pre-set, for the audio Selection Behaviour, use of Passthru retains the high quality of soundtracks; with anything else being encoded in AAC stereo.
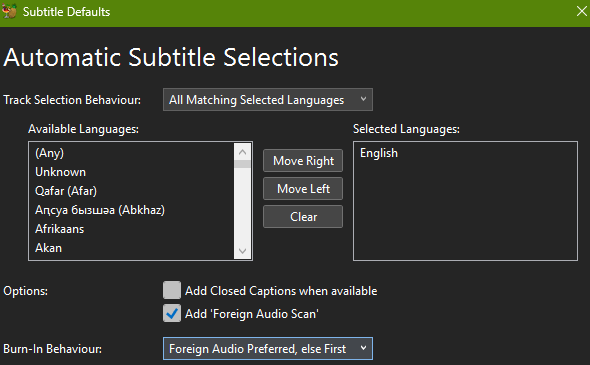
Note that the Selection Behaviour for Subtitles is configured to only select English, but since we weeded out only the English versions when ripping the disc with MakeMKV, you may think specifying it again is somewhat superfluous.
Handbrake Subtitle Defaults window
However, if a foreign language is spoken at some point in the film, HandBrake can perform a scan of the source title to try and detect if portions of the title are in a foreign language. If HandBrake does detects this, it will force the appropriate (English) subtitle track to be seen automatically. I’ve discovered that with problem titles (Avatar), that specifying the Burn-In Behaviour of Foreign Audio Preferred, else First did the trick of ensuring the desired outcome.
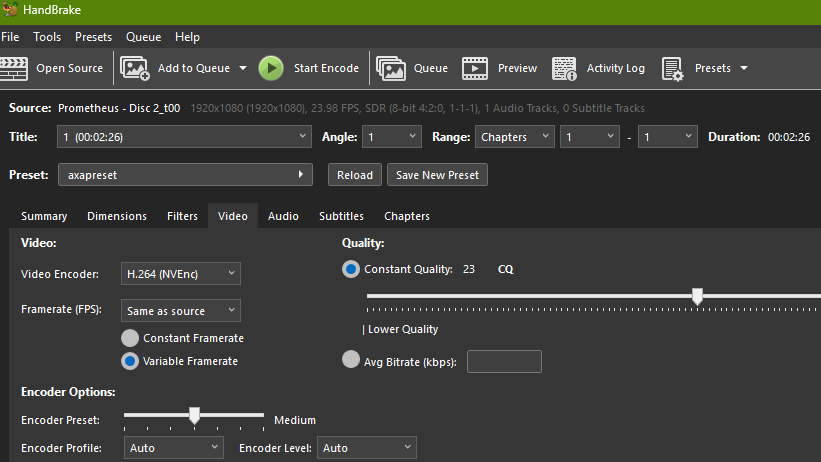
Video Encoding
Finally, the Video Encoder used is the H264 format. The newer H265 standard would result in a reduced file size, but it’s not as widely supported, hence the use of H264 for the time being.
Handbrake Video Encoding options
The Quality slider is set at a value recommended for 1080p Blu-ray. Since this is a logarithmic scale, the higher the quality setting, the significantly bigger the file. The consensus is that, from this value (23) onwards, it’s a case of diminishing returns. Obviously, this would require tweaking for lower quality DVDs and higher quality UHD discs.
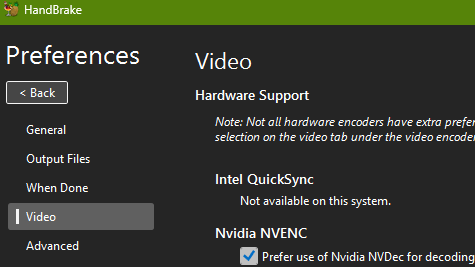
Lastly, since my PC has an NVidia graphics card, I configure the Video Preferences to use the associated driver to encode the files. Doing this greatly reduces the time taken to encode the files.
Handbrake Preferences window: selection of Nvidia NVENC driver
Once the discs are ripped and the resulting files are ready to be moved over to the NAS, the configuration of the media library has to be considered.
What About 3D Movies?
Having built a new PC, purchased a new NAS, and a sim racing rig, it’s safe to say that 2024 turned out to be a very expensive year! Striving for further sim racing immersion, I subsequently bought a Meta Quest 3 headset in Q4. Getting this VR headset to work alongside various different sim racing games was a headache. However, the Quest 3 has proved more than useful for other things. In terms of AV experience, use of the Skybox app has been an eye opener for movie watching, and the possibility of using it for 3D movies intriguing…
We are going off at a bit of a tangent here though. Granted you can store 3D movies under Plex control, however unless you own a 3D capable TV or projector, you can’t readily watch them from Plex. Furthermore, there is not a native Plex app for the Meta Quest; although I’ve yet to attempt to use the browser version of it via Meta Quest. Regardless, Skybox readily reads video files from a NAS, and the PLex naming conventions make location of any content an easy task.
Procedure for 3D Rips
The procedure for ripping a 3D Blu-ray is pretty much the same as before, namely the use of MakeMKV to decrypt the disc and write the contents to a hard drive on your PC.
MakeMKV Caveat
There is one caveat to using MakeMKV, and that is to ensure that you select the tick box associated with “Mpeg4-MVC-3D”. If this is not selected, the utility which actually creates the 3D movie will not work, and that utility is…
About BD3D2MK3D
After using MakeMKV to rip the disc, we switch our attention away from Handbrake, and instead use BD3D2MK3D, which is an acronym for Blu-ray Disc 3D to Matroska3D.
At the time of writing, v1.33 is the current version of BD3D2MK3D but, in order to run it, BD3D2MK3D has a further two other dependencies. These need to be sourced, downloaded and installed beforehand. These are:
Java Runtime Environment BD3D2MK3D requires a Java Runtime Environment (JRE) to execute. Oracle is the holder of everything Java related, however Oracle require payment to use their JRE. Far better and cheaper (free!) is to install the open source equivalent. This is where Eclipse Temurin comes to the fore. To download, go to https://adoptium.net/en-GB/temurin/releases/
At the time of writing, the current version was 21.0.5+11-LTS and if you’re a Win11 user, you’d be best advised to download the version for Windows x64 JRE MSI (filename: OpenJDK21U-jre_x64_windows_hotspot_21.0.5_11) Note all those keywords in bold, and also that the JDK is the Java Development Kit; this is a much larger install containing a load of superfluous stuff above & beyond the JRE.
AviSynth+ The installation media for AviSynth+ is located on GitHub. Here, you’ll have to scroll down to the Assets section to locate the appropriate media. At the time of writing v3.7.3_20230715 was the latest release for MS Windows (filename: AviSynthPlus_3.7.3_20230715.exe)
With a JRE and AviSynth+ installed, you can run BD3D2MK3D.
Using BD3D2MK3D
Keep in mind that the following pertains to creating a MKV video file which can be subsequently watched on a Meta Quest 3 VR headset. As such, other settings may have to be tweaked if the end game is different. Here’s what to do for each of the tabs presented:
Open MKV 3D When BD3D2MK3D executes, the first thing that needs to be done is to click on the Switch to 3D MKV button. This allows BD3D2MK3D to read the MakeMKV output (a MKV file) as input.
Select stream I deselect all but the primary Audio track
Title & tags Enter the title of the movie – this field is mandatory, all the other fields are optional.
Cover art I don’t bother with this…
Options and Go! Stereoscopy: deselect the Half tick box. Using the implied full stereoscopy gives a perceptibly sharper image. In addition movement across the screen is noticeably sharper and less jerky. X264 (h264 AVC) encoder options: change Level from do not force to force 5.0 (Full, 1080p) Go!: update the Project (temp) folder: field to the drive/directory of your choice. In the examples below, I use my secondary SSD D:\Videos\3DMKV
Note that when you click on the go button, BD3D2MK3D will nag you to ensure that you are sure that you want to go ahead, and yes you jolly well do.
How long the next two steps take are really dependant upon your hardware.
Once you’ve pressed the Go button BD3D2MK3D will scurry away, create a folder and populate it with about 30 files taking up anywhere between 30-60Gb. So make sure you have enough space available on your target drive!
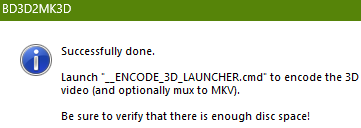
Once complete, a window will appear.
Notification window for BD3D2MK3D phase one complete
At this point fire up a Windows command prompt, and navigate to the Project (temp) folder: you specified previously. In my case, this is D:\Videos\3DMKV\Avatar\MKV3D and then enter the command __ENCODE_3D_LAUNCHER
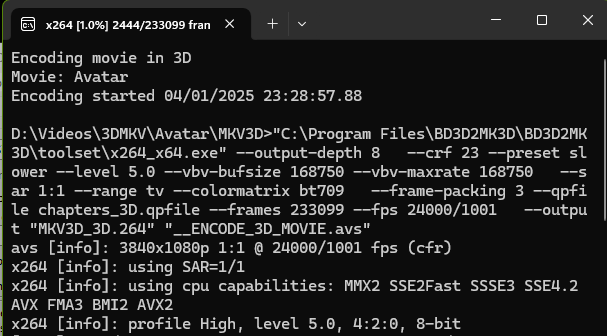
At this point the window shown below will appear, and you should go and make a beverage of your choice and perhaps start reading a book because this can take, and again it’s dependant upon your hardware capability, a long time.
ENCODE_3D_LAUNCHER command window
Once the BD3D2MK3D process has completed you will be able to move the resulting file over to the movie folder on the Synology NAS and watch the movie on a Meta Quest 3.
Plex Configuration
Due to the simplicity of installation of any package on DSM, there’s not a lot to say about Plex installation and configuration, but here are a handful:
When initially opening Plex from DSM to configure it, the URL might be incorrect. Read this Synology Community forum post for details.
To ensure the correct collection of online data by Plex, ensure that the file for the title is spelt correctly and includes the year of release in brackets i.e. Alien (1979).mkv
If there are multiple editions of a title, retain the year of the original release for both editions, and ensure the title name is suffixed with edition metadata, as per the example below:
Follow the Plex recommended method of organising your video collection by using a directory structure. See the Alien example below. After that, ensure that “Special Features” tracks are renamed to some meaningful title and then copy them into the appropriate directory.
This approach saves the hassle of having to rename a title and suffixing it with identifying metadata i.e.
Alien Deleted Scenes.mkv to Alien Deleted Scenes-deleted.mkv
A tedious task no matter how large or small your video collection! It’s a great deal easier to ensure a sensibly named file is moved into the appropriate directory.
An initial issue I encountered was the streaming of high quality rips; typically Blu-rays with loss-less 7.1 HD soundtracks. It transpired that, as shipped, LAN streaming of such titles was constricted. To resolve this, go to Settings > Plex Web > Quality and, under Home Streaming, change the Video quality to Maximum. This prevents any throttling of such rips and ensures that Plex continues to Direct Stream them.